

I loved the Daring Baker’s Challenge this month. I loved it because there is no way in hell I would ever consider making my own phyllo dough…except if someone dared me.
I mean you can buy perfectly good phyllo dough in any supermarket, right? But then I started to think, what if there is a qualitative difference between homemade and the thinner-than-paper dough available in the frozen aisle. Most homemade things are better, why should phyllo dough be any different? Plus they dared me…
So off I went. I enlisted the help of my friends Lita and Patti in this challenge, and I would recommend making phyllo dough as a team sport. Like so many things, it is more fun with a friend.
How was it? Let me cut to the chase, homemade phyllo dough is pretty easy and tastes great! I may never buy the the frozen stuff again. In fact, it was so easy, I made it twice.
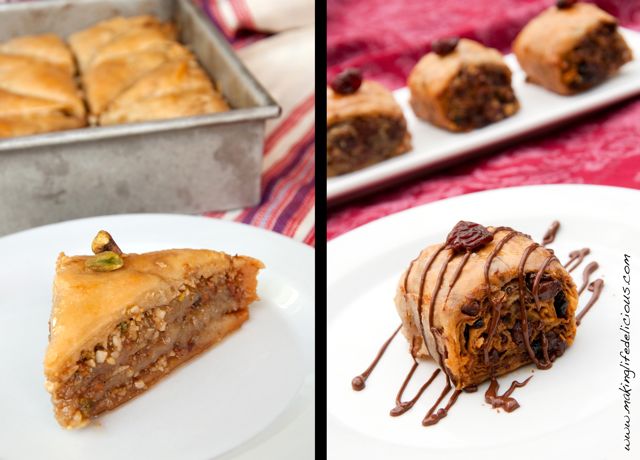
For my first batch of dough, I made a very traditional baklava with layers of nuts and phyllo soaked in a sweet orange-scented honey syrup. The result was a sticky sweet candy-like dessert that was a big hit with just about everybody, adults and children alike. A hit with everyone, in fact, but me. I found it to be too sweet…if you can imagine that. I also wanted it to be crispier.
So for round two, I mixed it up a bit. I thought about rugelach and strudel and how the baklava had similar qualities to both. And then I offered a piece of traditional baklava to my friend Patti and she said “If it isn’t chocolate, I’m not interested”. Hmmmm. Chocolate and nuts are good. Then I thought, chocolate, nuts and dried cherries are even better and chocolate cherry baklava was born. I added less syrup, sprinkled kosher salt on top and created something really special.

PHYLLO DOUGH
Recipe from Kaffeehaus – Exquisite Desserts from the Classic Cafés of Vienna, Budapest and Prague” by Rick Rodgers
- 2 2/3 cups (270 g/13 oz) unbleached all purpose flour
- 1/4 teaspoon (1 1/2 g) table salt
- 1 cup less 2 tablespoons water (210 ml), plus more if needed
- 4 tablespoons vegetable oil (60 ml), plus additional for coating the dough
- 1 teaspoon (5 ml) cider vinegar
In the bowl of your stand mixer combine flour and salt. Mix with paddle attachment. Combine water, oil and vinegar in a pyrex measuring cup. Add water & oil mixture with mixer on low speed, mix until you get a soft dough, if it appears dry add a little more water (I didn’t have to).

This is the texture you are looking for, sticks together.

Change to the dough hook and knead approximately 10 minutes. You will end up with beautiful smooth dough. If you are kneading by hand, knead approximately 20 minutes.

Remove the dough from mixer and continue to knead for 2 more minutes. Pick up the dough and through it down hard on the counter a few times during the kneading process. My daughter liked this part in particular. Shape the dough into a ball and lightly cover with oil.

Wrap the oiled dough ball tightly in plastic wrap and let rest for 90 minutes-to-2 hours (I let mine rest 90 minutes the first batch and 2 hours the second).
ROLLING YOUR PHYLLO
NOTE: Remove all rings and jewelry. Jewelry may snag the dough. This is important.
Use whatever means you have to get the dough as thin as you can. I had the most success with a french rolling pin, but this video shows a lady rolling out the dough very efficiently with a thin wooden dowel.
Unwrap your dough and cut off a chunk slightly larger then a golf ball. The weird pink hand is there for size reference.

NOTE: While you are rolling be sure to keep the other dough covered with plastic wrap to stay moist.
Be sure to flour your hands, rolling pin and counter. As you roll you will need to keep adding flour, don’t worry, apparently you can’t over-flour.
Roll out the dough a bit to flatten it out. Wrap the dough around your rolling pin/dowel. Roll back and forth quickly with the dough remaining on the dowel (see attached video for a visual, its much easier then it sounds). Alternatively, you can roll it in a more traditional manner. I found that it started to stick a little to the counter sometimes and that was a good thing because then the rolling pin stretched the dough even thinner.

Rotate and repeat until it is translucent. Don’t worry if the dough rips, as long as you have one perfect one for the top you will never notice. When you get it as thin as you can with the rolling pin, carefully pick it up with well-floured hands and stretch it on the backs of your hands as you would a pizza dough, this just helps make it that much thinner. Thank you Lita for being my hand model!
![]()
NOTE: It will never be as thin as the frozen phyllo dough you purchase at the store.
Set aside the layers of phyllo on a well-floured surface. Repeat the process until your dough is used up. Flour well between each finished sheet. You do not need to cover your dough with a wet cloth, as you do with boxed dough, it is moist enough that it will not dry out.

Dough can be made a head of time and frozen. Just remove from freezer and allow to thaw.
And now to the Baklava. Are you still with me?
For both types of baklava, you are going to need a syrup.
HONEY SYRUP for BAKLAVA
- 1 1/4 cups (300 ml) honey
- 1 1/4 cups (300ml) water
- 1 1/4 cups (300 ml) (280 gm/10 oz) sugar
- 1 cinnamon stick
- 1 (2-inch/50 mm) piece fresh orange peel
- a pinch or ground clove
Combine all ingredients in a medium pot over medium high heat. Stir occasionally until sugar has dissolved. Boil for 10 minutes, stir occasionally.
 Once boiled for 10 minutes remove from heat and strain cinnamon stick and orange peel, allow to cool as baklava cooks.
ROUND ONE
Orange-Scented Walnut, Almond and Pistachio Baklava
- 2 teaspoons (8 gm) ground cinnamon
- 1/4 teaspoon allspice
- 3/4 cup (170 gm/6 oz) blanched almonds
- 3/4 cup (155 gm/5 oz) toasted walnuts
- 3/4 cup (140 gm/5 oz) toasted pistachios
- 2/3 cup (150 gm/ 5 1/3 oz) sugar
- phyllo dough (see recipe above)
- 1 cup (2 sticks) (225g/8 oz) melted butter
- 2/3 recipe honey syrup (see recipe above)
Preheat oven to 350 degrees F.
Combine nuts, sugar and spices in a food processor and pulse on high until finely chopped. If you do not have a food processor chop with a sharp knife as fine as you can (but seriously, use a food processor). Set aside.

Trim your phyllo sheets to fit in your 9 X 9 baking pan
Brush bottom of pan with butter and place first phyllo sheet. Brush the first phyllo sheet with melted butter and repeat approximately 5 times ending with butter. (Most recipes say more, but homemade phyllo is thicker so it’s not needed).
 It doesn’t look perfect, but that doesn’t matter. Sprinkle 1/3 of the nut mixture on the buttered phyllo.

Continue layering phyllo and buttering, repeating 4 times. Sprinkle 1/3 of the nut mixture on top of that layer. Continue layering phyllo and buttering repeating 4 times. Sprinkle on the rest of the nut mixture.
Continue layering and buttering phyllo 5 more times. On the top layer, make sure you have a piece of phyllo with no holes if possible, just looks better.
With a sharp knife cut your baklava in desired shapes and number of pieces. I cut 18 triangles and the pieces were too big. Next time I would cut each triangle in half again. If you can’t cut all the ways through don’t worry you will cut again later. Then brush with a generous layer of butter making sure to cover every area and edge.

Bake for approximately 30 minutes; remove from oven and cut again this time all the way through. Continue baking for another 30 minutes. (Oven temperatures will vary, you are looking for the top to be a golden brown, watch closely as yours may need more or less time in the oven).

When baklava is cooked remove from oven and, while still hot, pour approximately 2/3 of the cooled (will still be warmish) syrup evenly over the top, taking care to cover all surfaces when pouring. It looks like it is a lot. However, you are about to let it sit overnight and, by the next morning, all the syrup will be absorbed.

Serve at room temperature.

Freezing/Storage Instructions/Tips: There are a few ways to store your baklava. One way is to store your baklava at room temperature in an airtight container. Stored at room temperature your baklava will last for up to 2 weeks. You will notice as the days pass it will get a little juicier and chewier. You may choose to store it in the fridge. This will make it a little harder and chewy, but does increase the shelf life. You can also freeze your baklava and then just set it out at room temperature to thaw.
ROUND TWO (my personal favorite)
Chocolate Cherry Baklava Rolls
- 1 teaspoon (4 gm) ground cinnamon
- 1/8 teaspoon allspice
- 1/4 cup plus 2 tablespoons (85 gm/3 oz) blanched almonds
- 1/4 cup plus 2 tablespoons (77 gm/2.5 oz) toasted walnuts
- 1/4 cup plus 2 tablespoons (70 gm/2.5 oz) toasted pistachios
- 1/3 cup (75 gm) sugar
- one recipe phyllo dough (see recipe above)
- 3/4 cup (1 1/2 sticks) (169g/6 oz) melted butter
- 1/3 recipe honey syrup (see recipe above)
- 1 cup dry sour cherries, chopped
- 1 1/2 cups semi-sweet chocolate chips, chopped (food processor works well)
- kosher salt for sprinkling
This recipe is similar and very different at the same time. Place a piece of parchment paper on your counter and cover with a layer of phyllo. Brush with melted butter and then sprinkle with 1/3 of the nut mixture.
 Cover with a single layer of phyllo, butter that dough and then sprinkle 1/3 of the cherries and chopped chocolate.


Repeat two more times. Layer of phyllo, butter, nuts, phyllo, chopped chocolate and cherries, phyllo, butter, nuts, phyllo, chocolate and cherries. See how easy that was.
Using the parchment to help. Roll all this deliciousness into a log. Again, it doesn’t have to be perfect. Thank you Patti for adding a little ham to the dessert. 
Slice into pieces and place in baking dish. Butter top of the baklava and sprinkle with kosher salt.
 Bake at 350 degrees F for 50 minutes or until crispy and golden brown on top. Douse the finished baklava with about 1/3 of the honey syrup. Let the baklava rest until the syrup in absorbed, at least one hour.

This baklava was easier to make, had a more complex taste and was generally crispier so I liked it better than the more traditional version.

Check out the cross section!
