

Hello everybody. Remember me? It has been a really long time since my last post. Where have I been? Working more than I have in years. In May, I started selling pies at the Clarendon Farmers Market in Arlington and it has sort of taken over my life. I love making pies and I’m proud of all that we have accomplished in a short time. The dark side of all this success is that both family meals and the blog have taken a backseat to pie baking for the past few weeks.
So this is just a quickie.
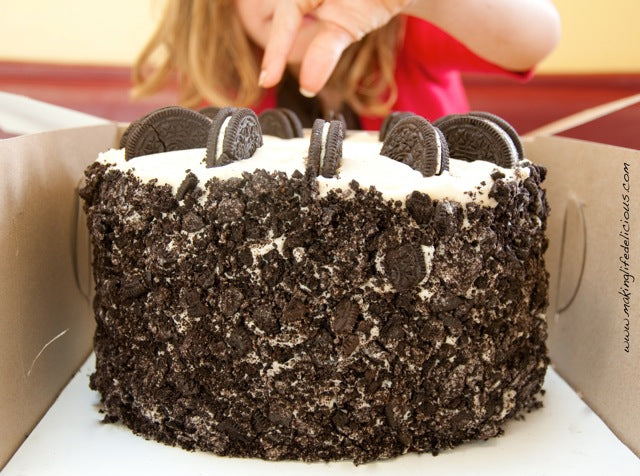
I made this cake for a young boy’s birthday party. Ben asked for a “Cookies & Cream” cake, so I pulled this little number together. The cake is my favorite chocolate cake because it is moist and very chocolatey with a nice crumb. Plus it is super easy to make. The frosting is my “go to” vanilla embellished with an unseemly amount of Oreo cookies, both crushed and semi-whole. More Oreos equals more better!
This recipe makes a very tall cake which is the way I like them. If you don’t want your cake to be quite so tall, it could easily be made in a 9-inch cake pan (baking time will be less) and you don’t need to slice the layers in half. However, let me point out that the more layers you have, the more opportunities you have to layer in more frosting. Just sayin’.
Oreos Cookies & Cream Cake
CHOCOLATE CAKE
Adapted from Bon Appetit
- shortening for greasing pans
- 2 cups all-purpose flour
- 1 teaspoon baking soda
- 1 teaspoon baking powder
- 1/2 teaspoon kosher salt
- 1 cup plus 3 tablespoons unsweetened cocoa powder
- 1 cup hot coffee, strong
- 2 cups sugar
- 3 large eggs, room temperature
- 3/4 cup vegetable oil
- 1 cup buttermilk
- 1 teaspoon vanilla extract
FROSTING
(or check out this recipe from the Savory Sweet Life. She explains things very well
- 1 1/2 cups unsalted butter
- 1/4 teaspoon kosher salt
- 5-6 cups powdered sugar
- 3-5 tablespoons whole milk
- 1 1/2 to 2 teaspoons vanilla
GARNISH
- 1 pound of Oreos, or more if you want to go CRAZY!
MAKE THE CAKE
Preheat oven to 350 degrees F. Grease two 8-inch round cake pans with shortening. Line bottom of pan with a parchment paper round. Grease parchment paper with shortening. Dust pan with flour, tapping out any excess.
Whisk together 2 cups flour, baking soda, baking powder, and salt into medium bowl.
Whisk cocoa in another medium bowl. Pour 1 cup hot coffee over cocoa. Whisk to blend.
 See how it looks really creamy and yummy when it is, in fact, incredibly bitter…have fun tricking your kids, or is that cruel?
 Using electric mixer, beat sugar and eggs in large bowl until light and fluffy, about 2 minutes. Add oil to egg mixture and beat until blended. Beat in cocoa mixture. Add buttermilk and vanilla. Beat to blend. Add dry ingredients and beat on low just to blend. Transfer batter to prepared pans, smooth top.
Bake cake until tester inserted into center comes out clean, about 30-35 minutes. Cool cake for ten minutes in the pans then turn out onto a rack to cool to room temperature on a rack.
MAKE THE FROSTING
Honestly, frosting is so easy, I never use a recipe anymore. Just cream the butter in a bowl until quite smooth and…well…creamy. Add the sugar, salt, vanilla and about half of the milk. Beat all of this together and then add more of the whole milk to make it the consistency that you want. I added quite a lot of milk this time because I wanted a very light frosting. If you add too much liquid, you can add more powdered sugar to make it the right consistency. This video shows pretty well how you can add what you need to get what you want.
ASSEMBLE THE CAKE
If your cake has a high dome, I suggest that you slice it off so that all your layers will be flat. This helps the cake structurally. Cut each cake round in two, so now you have four layers. Layer frosting and crushed Oreos between each later of cake then frost the whole outside of the cake with the frosting. Press crushed Oreos on the outside of the cake and decorate the top with half-Oreos.

The biggest challenge may be keeping little fingers off the cake until it is time to serve. Enjoy!